Sunday, December 29, 2019

Decorate It Sunday- New Year's Banner


Hold on Tight it's going to be a great Year!!!!

Wow 2020 already!! This New Year's banner was great fun and I got to use my neglected punch boards. These pictures don't show how glittery and shiny this banners is, its so pretty!!  This would be great for parties, classrooms, work cubbies, and more. 


Supplies needed:
The Polka Dot Orchard digi stamp Set - Swinging by with Holiday Cheer
Alphabet Punch Board
Banner Punch Board
Glitter 6x6 paper (I used Gold)
Black 65lb cardstock
markers or colored pencils
twine or string
Gold- Wink of Stella
Glue


Instructions:
First I punched the 2020 numbers using my Alphabet Punch Board. It had ben so long since I used it I had to look up instructions on how to make the 2 and 0. Then I cut out the banner pieces using my banner punch board. Next, I  colored my little girl images using a combination of markers (mostly Tombow). I added Gold Wink of Stella pen on the image and around the edges of the 2 end  banner pieces. Darn, the camera did not pick up how glittery this project came out. Finally, glue the images,  numbers, and sentiment to the banner pieces. String some twine through the holes and you have a spectacular banner.


Hope y'all give this a try and have a safe and happy New Year!!


Sunday, December 22, 2019

Decorate It Sunday Gift Wrap made from DigiStamp Background


Hi everyone, I created this cute wrapping paper using the background from the Beary Best Friend PDO DigiStamp. It was a quick idea that I thought turned out really cute! I used regular printer paper, Crayola Color Pencils and red and white Baker's twine.


Beary Best Friend DigiStamp

Sunday, December 15, 2019

Decorate It Sunday - Wreath


Decorate It Sunday
Wreath by Tracy Dennis


Supply List:

 Polka Dot Orchard Digital Stamp Sets- Home for the Holidays- Truck, Cozy Brew- snowflakes, Swinging by with Holiday Cheer-Merry Christmas

Wood sign 4 3/4"X 6 1/2"
 Wired Ribbon 3 1/2" wide -cut into 10" strips
Single sheet Buffalo Check Paper by The Paper Studio (Hobby Lobby)
Wreath 


-to attach the wood sign I just taped a pipe cleaner to the back so it can be twisted around the wreath.


I knew I just had to add this awesome truck to a wreath, it was so much fun. 
I colored and fussy cut the pieces needed. I used an existing branch of the wreath and twisted it around the middle of 2 strips of ribbon to secure it to the wreath. For the sign, I cut a piece of check paper the size of the wood sign then glued it into place. Then glued the sentiment and snowflake. Then secured it into place. This wreath did not take long at all and I love how it turned out. 


Sunday, December 8, 2019

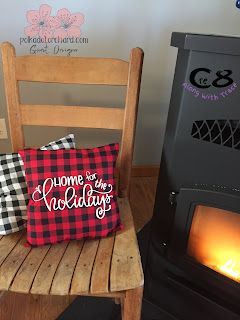
Digital Stamp Christmas Pillow using the Cricut

A Christmas Pillow 
using a Digital Stamp and the Cricut


Hi everyone, Trace here.  This project was so much fun to make and very very simple using your Cricut or another cutting machine. I must admit I wasn't sure how to accomplish this at first but the Cricut Design Space made it a snap. 

Supply List:
Fabric of your choice (I used a bandana 21"x 21") cut in half
Heat Transfer Vinyl (I used Siser HTV in white)
needle and thread 
polyfill or pillow stuffing
an Iron or a Cricut Heat Press
a cutting machine (Cricut)
Polka dot Orchard digital stamp set Home for the Holidays

How to make;
1- Keeping the bandana folded in half I cut it right down the middle following the existing crease. 
Basically cutting this in half keeping it folded (one less side to sew) so I can get 2 pillows from one bandana. Aprox. 11" X 11".


2- Since your Digi Stamp Set  is downloaded into your computer, incorporating the image to Cricut Design Space is easy.  Open a new Canvas, click "upload" from the left side menu. Click "upload Image" then "browse". Locate the Digi Stamp set file from your downloads files then click "Choose". Select the "Home for the Holidays" image then click "Choose". Now select "Simple" from the Image Type options then click "continue". A large image appears, click "continue".  Now choose "Save as a cut image", then click "Save". Now your image is in Design Space. Click the image and then click "Insert Image". The image will appear super large so just adjust the size to fit on the front of the fabric. Click "Make It" and follow the steps to cut the HTV with your Cricut. 
3- Weed and Iron or heat the image to the fabric. I positioned it with the fold at the top.
4- Hand sew or hot glue the edged leaving a small opening at the center of the  bottom edge. 
5- Stuff with pollyfil or use the stuffing from an old pillow. 
6- Sew the remaining part closed. 


Finished!!!
Wasn't that sew much fun LOL
This would make great gifts. I know I am going to make more. 
Hope you enjoy making these.
 Have a great day,  
   ~Trace

You Make Me Hole Donut Card

I had this card idea in my head for some time and I was so glad to finally bring it to life. This adorable digi image from Polka Dot Or...